例程讲解-04-edge_detection边缘检测
本例程为04-image-Filters-edge_detection.py
本例程的目的是实现边缘检测。
# 边缘检测例子:
#
# 这个程序示范了在图像上使用morph函数来进行边缘检测。
# 然后在进行阈值和滤波
import sensor, image, time
#设置核函数滤波,核内每个数值值域为[-128,127],核需为列表或元组
kernel_size = 1 # kernel width = (size*2)+1, kernel height = (size*2)+1
kernel = [-1, -1, -1,\
-1, +8, -1,\
-1, -1, -1]
# 这个一个高通滤波器。见这里有更多的kernel
# http://www.fmwconcepts.com/imagemagick/digital_image_filtering.pdf
thresholds = [(100, 255)] # grayscale thresholds设置阈值
sensor.reset() # 初始化 sensor.
sensor.set_pixformat(sensor.GRAYSCALE) # or sensor.RGB565
sensor.set_framesize(sensor.QQVGA) # or sensor.QVGA (or others)
sensor.skip_frames(10) # 让新的设置生效
clock = time.clock() # 追踪FPS
# 在OV7725 sensor上, 边缘检测可以通过设置sharpness/edge寄存器来增强。
# 注意:这个会edge detection can be enhanced
# significantly by setting the sharpness/edge registers.
# Note: This will be implemented as a function later.
if (sensor.get_id() == sensor.OV7725):
sensor.__write_reg(0xAC, 0xDF)
sensor.__write_reg(0x8F, 0xFF)
while(True):
clock.tick() # Track elapsed milliseconds between snapshots().
img = sensor.snapshot() # Take a picture and return the image.
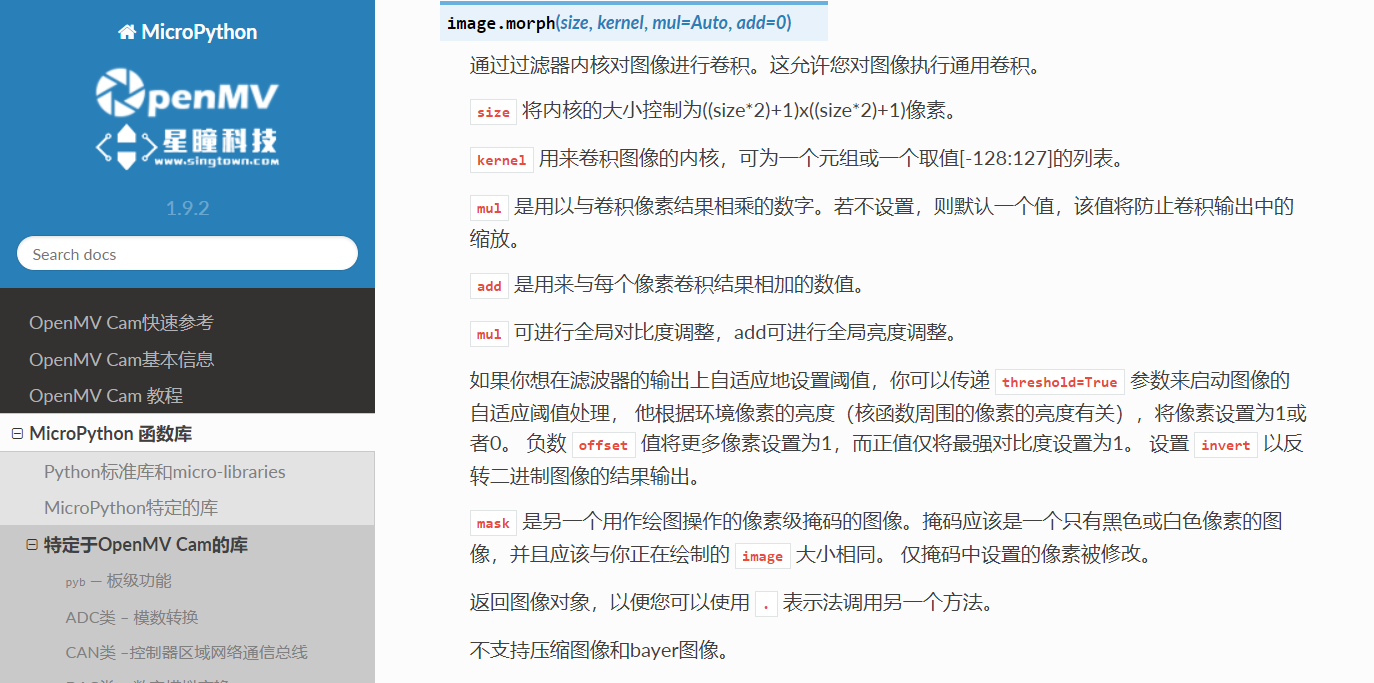
img.morph(kernel_size, kernel)
#morph(size, kernel, mul=Auto, add=0),morph变换,mul根据图像对比度
#进行调整,mul使图像每个像素乘mul;add根据明暗度调整,使得每个像素值加上add值。
#如果不设置则不对morph变换后的图像进行处理。
img.binary(thresholds)
#利用binary函数对图像进行分割
# Erode pixels with less than 2 neighbors using a 3x3 image kernel
img.erode(1, threshold = 2)
#侵蚀函数erode(size, threshold=Auto),去除边缘相邻处多余的点。threshold
#用来设置去除相邻点的个数,threshold数值越大,被侵蚀掉的边缘点越多,边缘旁边
#白色杂点少;数值越小,被侵蚀掉的边缘点越少,边缘旁边的白色杂点越多。
print(clock.fps()) # Note: Your OpenMV Cam runs about half as fast while
# connected to your computer. The FPS should increase once disconnected.
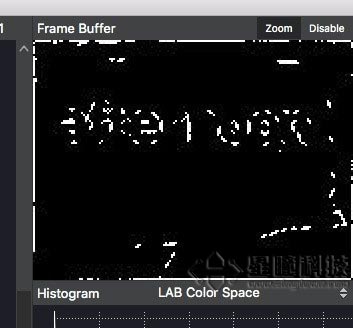
原图:

边缘检测后的图像:
img.erode(1, threshold = 2)
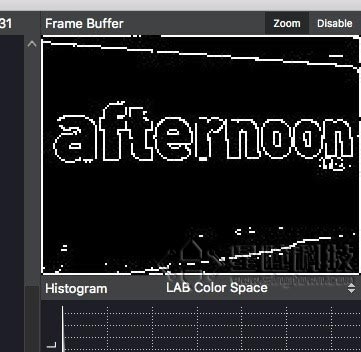
img.erode(1, threshold = 4) threshold过大被侵蚀掉的边缘点过多,边缘不清晰连贯,图像偏黑